비동기 흐름의 제어, React Suspense 들여다보기

시작하며
비동기 데이터 통신을 하다 보면 사용자에게 데이터 상태를 보여주기 위해 isLoading, isError 상태를 선언하곤 했습니다.
하지만 컴포넌트 내부에 데이터 상태를 나타내기 위한 방어 코드를 작성하다 보면, 곳곳에 if (isLoading) { ... }이나 if (isError) { ... } 구문이 범벅이 되는 경우가 많았습니다.
자연스럽게 '이 조건문은 왜 들어갔지?', '이 상태일 때 어떤 UI를 보여주고 있지?' 하며 찾는 과정이 추가되었습니다. 블록을 오가며 위아래로 스크롤을 계속 반복하다 보면 눈이 피로해지고, 결국 코드를 파악하는 데 인지적 부하가 심해집니다.
과거 처음 Suspense를 사용했을 때를 생각해보면, 이러한 상태 관리 코드의 수가 확연히 줄어들고 데이터의 상태를 직관적으로 쉽게 추적할 수 있어서 정말 편하게 느껴졌습니다.
그래서 이번 기회에 Suspense의 등장 배경부터 내부 동작 원리, 그리고 실제 Suspense의 적용 범위를 고민하며 머리 아팠던 기억들을 되살려 글을 정리해 보려고 합니다.
Suspense의 등장 이전
Suspense의 등장 이전까지는 컴포넌트 내부에서 비동기 데이터의 상태(로딩 중, 에러, 완료 시 데이터)를 각각의 상태(state)로 직접 관리해야만 했습니다. 주로 useEffect를 통해 데이터를 가져오고(fetch), 그 진행 상황에 맞추어 isLoading과 isError 상태를 업데이트하는 방식이었습니다.
코드를 떠올려보면 다음과 같은 형태였습니다.
import { useState, useEffect } from "react";

import { fetchUser } from "./api";

function UserProfile({ userId }) {
  const [data, setData] = useState(null);
  const [isLoading, setIsLoading] = useState(false);
  const [isError, setIsError] = useState(false);

  useEffect(() => {
    const loadData = async () => {
      setIsLoading(true);
      setIsError(false);

      try {
        const response = await fetchUser(userId);
        setData(response);
      } catch (error) {
        setIsError(true);
      } finally {
        setIsLoading(false);
      }
    };

    loadData();
  }, [userId]);

  if (isLoading) {
    return <div>유저 정보를 불러오는 중입니다... </div>;
  }

  if (isError) {
    return <div>데이터를 불러오는 데 실패했습니다. </div>;
  }

  if (!data) {
    return null;
  }

  return (
    <div>
      <h2>{data.name}의 프로필</h2>
      <p>{data.email}</p>
    </div>
  );
}
위 코드를 보면 UI 렌더링이라는 핵심 컴포넌트의 목표보다, 데이터를 화면에 안전하게 그리기 위한 방어 코드(if)와 상태 관리 로직이 훨씬 더 큰 비중을 차지하고 있습니다.
게다가 한 화면에 이런 컴포넌트가 여러 개 배치된다면, 우리는 각 컴포넌트마다 제각기 나타났다가 사라지는 스피너들을 보게 될 것이며, 이들의 로딩 상태를 조율하는 것은 무척 까다로운 일이 됩니다.
React 팀은 이처럼 각각의 컴포넌트가 파편화된 로딩 상태를 지니는 구조적인 한계를 극복하고, 비동기 상태의 처리 구문을 선언적으로 다룰 수 있도록 돕기 위해 Suspense를 내놓게 되었습니다.
Suspense의 등장
Suspense라는 이름이 세상에 처음 등장한 것은 2018년, React 16.6 버전이었습니다. 하지만 발표 직후 많은 개발자들이 기대에 부풀었던 것과 달리 당시의 Suspense는 반쪽짜리에 불과했습니다. 오직 React.lazy를 이용한 컴포넌트 지연 로딩(Code Splitting)에서만 공식적으로 사용할 수 있었고, 데이터 패칭에 결합하는 것은 실험적인 기능으로만 남겨져 있었습니다.
이후 오랜 시간 동안 과도기를 거치게 됩니다. React 팀은 내부적으로 Concurrent Mode(동시성 모드)를 개발중이었습니다. 이 동시성 엔진과 Suspense가 결합해야만 비로소 완벽한 비동기 렌더링 제어가 가능했기 때문입니다. 하지만 후속 버전이었던 React 17은 호환성과 마이그레이션에 초점을 맞춘 성격의 릴리스였기에, 데이터 패칭을 위한 Suspense 정식 지원은 또다시 미뤄졌습니다.
그리고 마침내 2022년, React 18이 릴리스되면서 Suspense는 드디어 완전한 제 모습을 갖추게 되었습니다. React 18의 핵심인 Concurrent Features(동시성 렌더링)를 기반으로 동작하게 되면서, 비동기 데이터 요청과 React의 렌더링 파이프라인이 매끄럽게 결합된 것입니다. 더불어 SSR 환경에서의 스트리밍 렌더링까지 지원하게 되면서, Suspense의 본격적인 시작이 되었습니다.
Suspense의 사용법
Suspense의 사용법은 굉장히 간단합니다. 비동기 데이터를 읽어오는 로직과 예외 처리는 컴포넌트 외부나 부모에게 위임하고, 화면을 그리는 컴포넌트는 오직 '데이터가 성공적으로 불러와졌을 때'의 UI 렌더링에만 집중하면 됩니다.
앞서 isLoading과 isError 조건문으로 뒤덮여 있던 코드가 Suspense와 ErrorBoundary를 만나면 다음과 같이 짧아집니다.
import { Suspense } from "react";
import { ErrorBoundary } from "react-error-boundary";

import { useUser } from "./api";

function UserProfile({ userId }) {
  const data = useUser(userId);

  return (
    <div>
      <h2>{data.name}의 프로필</h2>
      <p>{data.email}</p>
    </div>
  );
}

function UserProfileWrapper({ userId }) {
  return (
    <ErrorBoundary fallback={<div>데이터를 불러오는 데 실패했습니다. </div>}>
      <Suspense fallback={<div>유저 정보를 불러오는 중입니다... </div>}>
        <UserProfile userId={userId} />
      </Suspense>
    </ErrorBoundary>
  );
}
이제 UserProfile 컴포넌트는 오직 자신이 할 일인 '렌더링'에만 신경 쓸 수 있게 되었습니다. 데이터가 아직 준비되지 않았다면 가장 가까운 부모의 Suspense가 렌더링을 멈추고 fallback UI를 대신 보여주며, 데이터를 불러오다 에러가 발생하면 가장 가까운 ErrorBoundary가 에러 UI를 처리해 줍니다.
마치 try / catch를 쓰듯이 선언적이고 직관적으로 코드를 읽을 수 있게 된 것입니다.
Suspense가 왜 좋은데?
위에서 코드의 변화를 살펴보았듯, Suspense가 개발에 가져다주는 장점을 요약하자면 다음과 같습니다.
-
선언형 프로그래밍
개발자는 더 이상
if (isLoading)과 같은 로딩 상태 확인(명령형)에 신경 쓰지 않아도 됩니다. 화면을 렌더링하는 컴포넌트 밖에서 "데이터가 로드되는 동안 이fallback을 보여줘"라고 선언만 하면, React가 렌더링 파이프라인 안에서 알아서 전환을 제어해 줍니다. 코드를 위에서 아래로 물 흐르듯 읽을 수 있어 가독성이 크게 좋아집니다. -
관심사의 분리
데이터를 화면에 보여주는 로직과 로딩/에러 화면을 띄워주는 비동기 예외 처리 로직이 분리됩니다. 자식 컴포넌트(
UserProfile)는 복잡한 생명주기 관리 없이 렌더링만 챙기면 되고, 부모 컴포넌트는 화면의 로딩 상태를 조율하는 책임만 지게 되어 유지보수가 훨씬 수월해집니다. -
로딩 UI의 조율
과거에는 화면 안에 3개의 비동기 컴포넌트가 있다면, 각자 데이터를 다르게 받아오며 스피너 3개가 산발적으로 깜빡거리는 산만한 사용자 경험(UX)을 주곤 했습니다. Suspense를 도입하면 이 하위 컴포넌트들을 하나의
Suspense Boundary로 크게 묶어서, "모든 데이터가 다 준비됐을 때 한꺼번에 자연스럽게 화면을 전환하자"는 식의 수준 높은 UI 조율이 가능해집니다.
Suspense의 내부 원리: Promise를 던지다
앞서 우리가 비동기 데이터 로딩 상태와 예외 처리를 부모(Suspense와 ErrorBoundary)에게 위임할 수 있었던 이유는 무엇일까요?
선언적 패턴의 비밀은 바로 자바스크립트의 throw 구문에 있습니다.
1. ErrorBoundary와의 강력한 유사성
우리가 예외 처리할 때 try / catch를 사용하듯, React 컴포넌트 트리에서는 자식 컴포넌트가 렌더링 도중 Error 객체를 밖으로 던져버리면(throw), 가장 가까운 부모인 ErrorBoundary가 이를 catch하여 에러 UI를 보여줍니다.
Suspense의 작동 원리도 이와 동일한 메커니즘을 따릅니다. 단지 밖으로 던지는 대상이 에러 객체가 아니라 Promise 객체라는 점이 다를 뿐입니다.
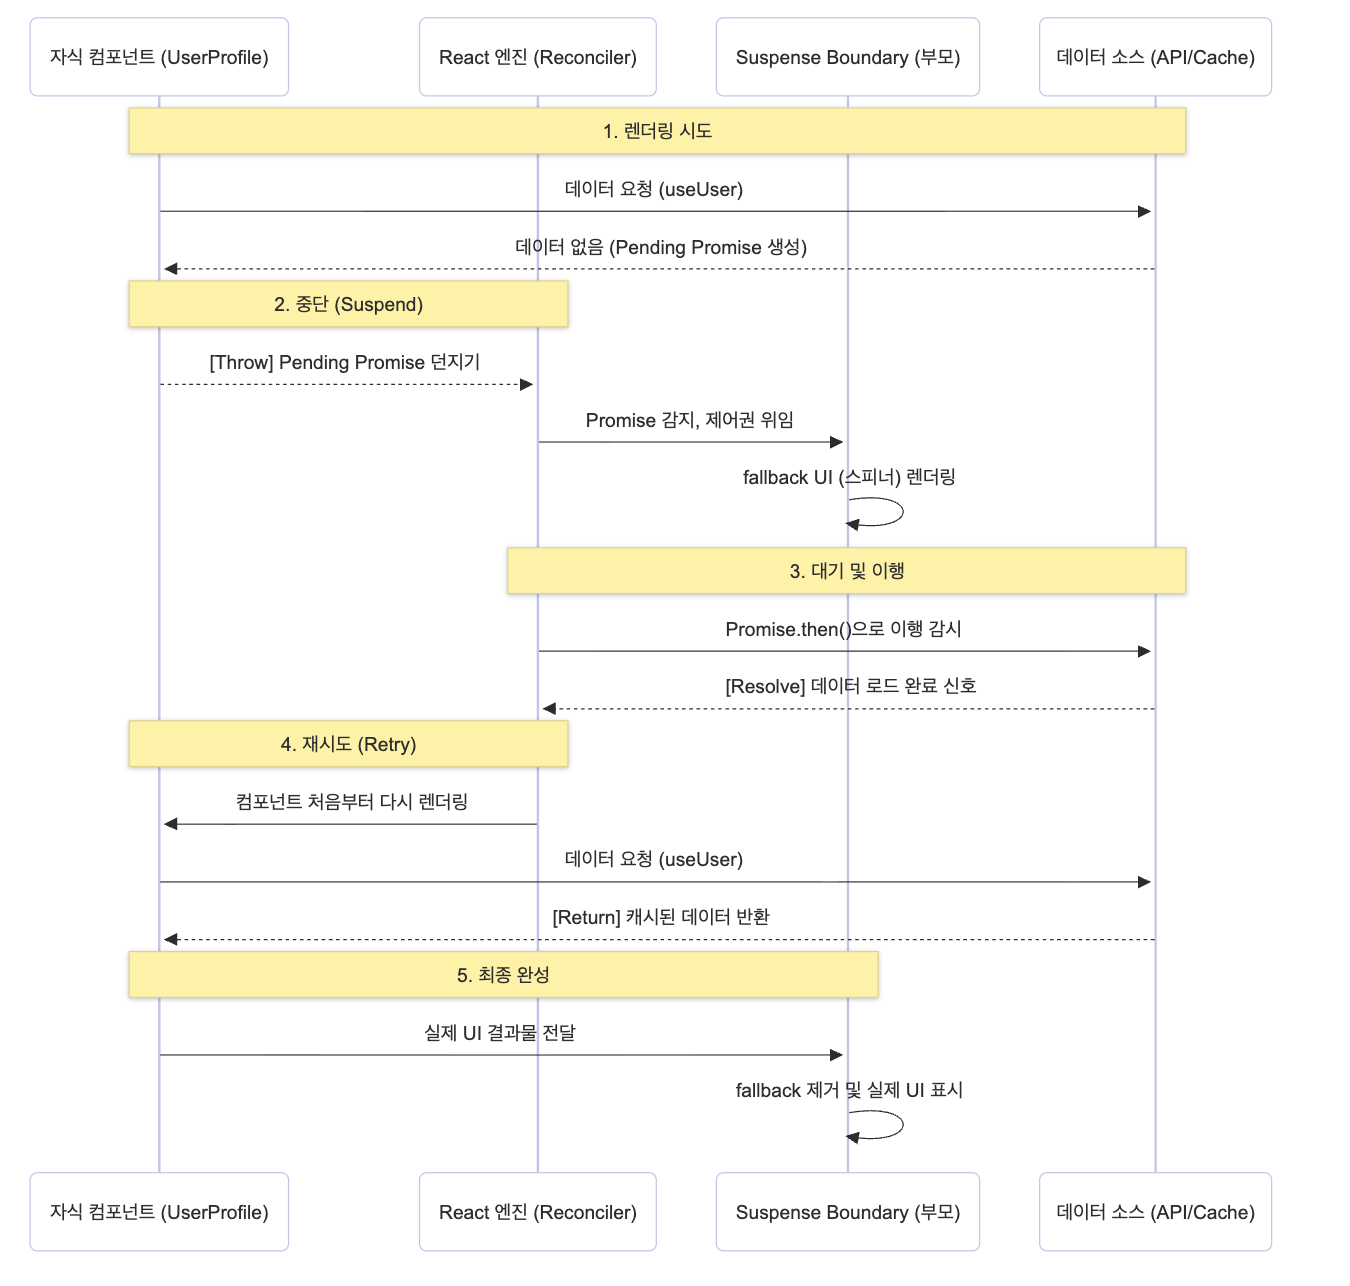
2. throw Promise라는 발상의 전환
컴포넌트는 렌더링 과정에서 언제나 데이터를 동기적으로 읽어오려고 시도합니다. 이때 데이터가 아직 캐싱되어 있지 않거나 네트워크 요청중(Pending) 이라면, 데이터 패칭 라이브러리는 진행 중인 Promise 객체를 중단시키며 throw 해버립니다.
React는 렌더링을 계속 수행하다가 갑자기 무언가 throw 되었다는 것을 감지합니다.
- 만약 날아온 것이
Error라면 가장 가까운ErrorBoundary에게 제어권을 넘깁니다. - 만약 날아온 것이
Promise라면 "이 컴포넌트는 아직 렌더링할 준비가 안 됐구나" 하고 해당 컴포넌트의 렌더링 작업을 즉시 멈추고(Suspend), 가장 가까운Suspense에게 제어권을 넘겨fallbackUI(스피너 등)를 대신 화면에 띄웁니다.
React 내부 소스 코드 일부 보기(주의: 코드 매우 김)
//packages/react-reconciler/src/ReactFiberThrow.js
function throwException(
  root: FiberRoot,
  returnFiber: Fiber | null,
  sourceFiber: Fiber,
  value: mixed,
  rootRenderLanes: Lanes,
): boolean {
  // The source fiber did not complete.
  sourceFiber.flags |= Incomplete;

  if (enableUpdaterTracking) {
    if (isDevToolsPresent) {
      // If we have pending work still, restore the original updaters
      restorePendingUpdaters(root, rootRenderLanes);
    }
  }

  if (value !== null && typeof value === 'object') {
    if (typeof value.then === 'function') {
      // This is a wakeable. The component suspended.
      const wakeable: Wakeable = (value: any);
      resetSuspendedComponent(sourceFiber, rootRenderLanes);

      if (__DEV__) {
        if (
          getIsHydrating() &&
          (disableLegacyMode || sourceFiber.mode & ConcurrentMode)
        ) {
          markDidThrowWhileHydratingDEV();
        }
      }

      // Mark the nearest Suspense boundary to switch to rendering a fallback.
      const suspenseBoundary = getSuspenseHandler();
      if (suspenseBoundary !== null) {
        switch (suspenseBoundary.tag) {
          case ActivityComponent:
          case SuspenseComponent:
          case SuspenseListComponent: {
            // If this suspense/activity boundary is not already showing a fallback, mark
            // the in-progress render as suspended. We try to perform this logic
            // as soon as soon as possible during the render phase, so the work
            // loop can know things like whether it's OK to switch to other tasks,
            // or whether it can wait for data to resolve before continuing.
            // TODO: Most of these checks are already performed when entering a
            // Suspense boundary. We should track the information on the stack so
            // we don't have to recompute it on demand. This would also allow us
            // to unify with `use` which needs to perform this logic even sooner,
            // before `throwException` is called.
            if (disableLegacyMode || sourceFiber.mode & ConcurrentMode) {
              if (getShellBoundary() === null) {
                // Suspended in the "shell" of the app. This is an undesirable
                // loading state. We should avoid committing this tree.
                renderDidSuspendDelayIfPossible();
              } else {
                // If we suspended deeper than the shell, we don't need to delay
                // the commmit. However, we still call renderDidSuspend if this is
                // a new boundary, to tell the work loop that a new fallback has
                // appeared during this render.
                // TODO: Theoretically we should be able to delete this branch.
                // It's currently used for two things: 1) to throttle the
                // appearance of successive loading states, and 2) in
                // SuspenseList, to determine whether the children include any
                // pending fallbacks. For 1, we should apply throttling to all
                // retries, not just ones that render an additional fallback. For
                // 2, we should check subtreeFlags instead. Then we can delete
                // this branch.
                const current = suspenseBoundary.alternate;
                if (current === null) {
                  renderDidSuspend();
                }
              }
            }

            suspenseBoundary.flags &= ~ForceClientRender;
            markSuspenseBoundaryShouldCapture(
              suspenseBoundary,
              returnFiber,
              sourceFiber,
              root,
              rootRenderLanes,
            );
            // Retry listener
            //
            // If the fallback does commit, we need to attach a different type of
            // listener. This one schedules an update on the Suspense boundary to
            // turn the fallback state off.
            //
            // Stash the wakeable on the boundary fiber so we can access it in the
            // commit phase.
            //
            // When the wakeable resolves, we'll attempt to render the boundary
            // again ("retry").

            // Check if this is a Suspensey resource. We do not attach retry
            // listeners to these, because we don't actually need them for
            // rendering. Only for committing. Instead, if a fallback commits
            // and the only thing that suspended was a Suspensey resource, we
            // retry immediately.
            // TODO: Refactor throwException so that we don't have to do this type
            // check. The caller already knows what the cause was.
            const isSuspenseyResource =
              wakeable === noopSuspenseyCommitThenable;
            if (isSuspenseyResource) {
              suspenseBoundary.flags |= ScheduleRetry;
            } else {
              const retryQueue: RetryQueue | null =
                (suspenseBoundary.updateQueue: any);
              if (retryQueue === null) {
                suspenseBoundary.updateQueue = new Set([wakeable]);
              } else {
                retryQueue.add(wakeable);
              }

              // We only attach ping listeners in concurrent mode. Legacy
              // Suspense always commits fallbacks synchronously, so there are
              // no pings.
              if (disableLegacyMode || suspenseBoundary.mode & ConcurrentMode) {
                attachPingListener(root, wakeable, rootRenderLanes);
              }
            }
            return false;
          }
          case OffscreenComponent: {
            if (disableLegacyMode || suspenseBoundary.mode & ConcurrentMode) {
              suspenseBoundary.flags |= ShouldCapture;
              const isSuspenseyResource =
                wakeable === noopSuspenseyCommitThenable;
              if (isSuspenseyResource) {
                suspenseBoundary.flags |= ScheduleRetry;
              } else {
                const offscreenQueue: OffscreenQueue | null =
                  (suspenseBoundary.updateQueue: any);
                if (offscreenQueue === null) {
                  const newOffscreenQueue: OffscreenQueue = {
                    transitions: null,
                    markerInstances: null,
                    retryQueue: new Set([wakeable]),
                  };
                  suspenseBoundary.updateQueue = newOffscreenQueue;
                } else {
                  const retryQueue = offscreenQueue.retryQueue;
                  if (retryQueue === null) {
                    offscreenQueue.retryQueue = new Set([wakeable]);
                  } else {
                    retryQueue.add(wakeable);
                  }
                }

                attachPingListener(root, wakeable, rootRenderLanes);
              }
              return false;
            }
          }
        }
        throw new Error(
          `Unexpected Suspense handler tag (${suspenseBoundary.tag}). This ` +
            'is a bug in React.',
        );
      } else {
        // No boundary was found. Unless this is a sync update, this is OK.
        // We can suspend and wait for more data to arrive.

        if (disableLegacyMode || root.tag === ConcurrentRoot) {
          // In a concurrent root, suspending without a Suspense boundary is
          // allowed. It will suspend indefinitely without committing.
          //
          // TODO: Should we have different behavior for discrete updates? What
          // about flushSync? Maybe it should put the tree into an inert state,
          // and potentially log a warning. Revisit this for a future release.
          attachPingListener(root, wakeable, rootRenderLanes);
          renderDidSuspendDelayIfPossible();
          return false;
        } else {
          // In a legacy root, suspending without a boundary is always an error.
          const uncaughtSuspenseError = new Error(
            'A component suspended while responding to synchronous input. This ' +
              'will cause the UI to be replaced with a loading indicator. To ' +
              'fix, updates that suspend should be wrapped ' +
              'with startTransition.',
          );
          value = uncaughtSuspenseError;
        }
      }
    }
  }
//...- thrown 값이 thenable인지 검사하고(즉, Suspense로 취급), 소스 fiber를 Incomplete로 표시한 뒤 resetSuspendedComponent를 호출해 suspended 상태 준비를 합니다.
- 현재의 Suspense 핸들러(가장 가까운 경계)를 getSuspenseHandler()로 얻고, 상황에 따라 renderDidSuspend / renderDidSuspendDelayIfPossible 등을 호출해 work-loop에 상황을 알립니다.
- 최종적으로 markSuspenseBoundaryShouldCapture를 호출해 그 경계를 “fallback으로 전환해야 함”으로 표시합니다.
// packages/react-reconciler/src/ReactFiberThrow.js
function resetSuspendedComponent(sourceFiber: Fiber, rootRenderLanes: Lanes) {
  const currentSourceFiber = sourceFiber.alternate;
  if (currentSourceFiber !== null) {
    // Since we never visited the children of the suspended component, we
    // need to propagate the context change now, to ensure that we visit
    // them during the retry.
    //
    // We don't have to do this for errors because we retry errors without
    // committing in between. So this is specific to Suspense.
    propagateParentContextChangesToDeferredTree(
      currentSourceFiber,
      sourceFiber,
      rootRenderLanes,
    );
  }

  // Reset the memoizedState to what it was before we attempted to render it.
  // A legacy mode Suspense quirk, only relevant to hook components.
  const tag = sourceFiber.tag;
  if (
    !disableLegacyMode &&
    (sourceFiber.mode & ConcurrentMode) === NoMode &&
    (tag === FunctionComponent ||
      tag === ForwardRef ||
      tag === SimpleMemoComponent)
  ) {
    const currentSource = sourceFiber.alternate;
    if (currentSource) {
      sourceFiber.updateQueue = currentSource.updateQueue;
      sourceFiber.memoizedState = currentSource.memoizedState;
      sourceFiber.lanes = currentSource.lanes;
    } else {
      sourceFiber.updateQueue = null;
      sourceFiber.memoizedState = null;
    }
  }
}- suspend된 컴포넌트의 컨텍스트/상태 전파를 조정하고(특히 legacy quirks 처리), 재시도 시 올바르게 동작하도록 현재/alternate 상태를 복구합니다.
// packages/react-reconciler/src/ReactFiberSuspenseContext.js
export function pushOffscreenSuspenseHandler(fiber: Fiber): void {
  if (fiber.tag === OffscreenComponent) {
    // A SuspenseList context is only pushed here to avoid a push/pop mismatch.
    // Reuse the current value on the stack.
    // TODO: We can avoid needing to push here by by forking popSuspenseHandler
    // into separate functions for Activity, Suspense and Offscreen.
    push(suspenseStackCursor, suspenseStackCursor.current, fiber);
    push(suspenseHandlerStackCursor, fiber, fiber);
    if (shellBoundary === null) {
      // We're rendering hidden content. If it suspends, we can handle it by
      // just not committing the offscreen boundary.
      shellBoundary = fiber;
    }
  } else {
    // This is a LegacyHidden component.
    reuseSuspenseHandlerOnStack(fiber);
  }
}
//...

export function pushFallbackTreeSuspenseHandler(fiber: Fiber): void {
  // We're about to render the fallback. If something in the fallback suspends,
  // it's akin to throwing inside of a `catch` block. This boundary should not
  // capture. Reuse the existing handler on the stack.
  reuseSuspenseHandlerOnStack(fiber);
}
// ...

export function pushOffscreenSuspenseHandler(fiber: Fiber): void {
  if (fiber.tag === OffscreenComponent) {
    // A SuspenseList context is only pushed here to avoid a push/pop mismatch.
    // Reuse the current value on the stack.
    // TODO: We can avoid needing to push here by by forking popSuspenseHandler
    // into separate functions for Activity, Suspense and Offscreen.
    push(suspenseStackCursor, suspenseStackCursor.current, fiber);
    push(suspenseHandlerStackCursor, fiber, fiber);
    if (shellBoundary === null) {
      // We're rendering hidden content. If it suspends, we can handle it by
      // just not committing the offscreen boundary.
      shellBoundary = fiber;
    }
  } else {
    // This is a LegacyHidden component.
    reuseSuspenseHandlerOnStack(fiber);
  }
}
// ...- 경계 진입 시 pushPrimaryTreeSuspenseHandler / pushFallbackTreeSuspenseHandler / pushOffscreenSuspenseHandler 등으로 핸들러가 스택에 푸시되고(getSuspenseHandler가 이를 반환), 경계에서 빠져나올 때 popSuspenseHandler로 팝합니다. 이 스택 덕분에 throwException이 “가장 가까운 경계”를 찾을 수 있습니다.
요약하면 핵심 함수/파일
- throwException (ReactFiberThrow.js) — thenable(=suspend) 감지, resetSuspendedComponent 호출, 경계 마킹(markSuspenseBoundaryShouldCapture)
- markSuspenseBoundaryShouldCapture (ReactFiberThrow.js) — 경계에 ShouldCapture/DidCapture 설정(=fallback 전환 신호)
- resetSuspendedComponent (ReactFiberThrow.js) — suspend된 컴포넌트 상태 정리(재시도 준비)
- ReactFiberSuspenseContext.js — Suspense 핸들러/스택(push/pop) 및 SuspenseList 관련 컨텍스트 관리
- ReactFiberCompleteWork.js — Suspense 경계 완료 단계(타임아웃 판정, retry-listener 스케줄)
- ReactFiberCommitWork.js / ReactFiberCommitHostEffects.js — 커밋 단계에서 fallback 보이기/숨기기, 하이드레이트 경계 처리
- ReactFiberWorkLoop.js + 렌더러 config (ReactFiberConfig.*) — wakeable resolve 후 루트 ping/스케줄 및 렌더 재시작
3. Promise의 해제를 추적하고 렌더링을 다시하기
그렇다면 화면에 스피너를 띄워두고 언제 다시 데이터를 렌더링하는 걸까요?
React는 방금 자식 컴포넌트가 던져버린 Promise를 잡아서(.then() 혹은 await), 그 Promise가 이행(resolve)되기를 기다립니다.
통신이 끝나고 프로미스가 resolve 상태로 바뀌면, React는 방금 전 멈춰 두었던(Suspend) 해당 컴포넌트의 렌더링 작업을 처음부터 다시 시도합니다.
이번에는 네트워크 요청을 기다릴 필요 없이 데이터가 캐시에 안전하게 존재하므로, 그 어떤 것도 throw하지 않고 반환하며 렌더링을 끝내게 됩니다.
이 동작 과정을 이해하기 쉽도록 의사 코드로 간단하게 표현해보면 아래와 같습니다.
let cache = new Map();

function fetchData(id) {
  // 1. 이미 응답받은 데이터가 캐시에 있다면 그대로 반환
  if (cache.has(id)) {
    return cache.get(id);
  }

  // 2. 캐시에 데이터가 없다면 비동기 네트워크 요청 시작
  const promise = fetch(`/api/data/${id}`)
    .then((res) => res.json())
    .then((data) => cache.set(id, data));

  // 3. 진행 중인 Promise 객체 자체를 에러처럼 throw 해버림
  // -> 여기서 컴포넌트 실행은 중단되고 Suspense가 fallback을 그림
  throw promise;
}
4. 왜 ErrorBoundary를 꼭 함께 사용할까?
앞서 사용법 섹션에서 Suspense 겉을 ErrorBoundary로 한 번 더 감싸둔 것을 보셨을 겁니다. 왜 둘은 함께 써야하는걸까요?
데이터 패칭 과정은 불안정합니다. 네트워크가 끊기거나, 서버가 500 에러를 뱉거나, 응답 데이터가 손상될 수 있습니다. 앞서 설명했듯 React는 자식 컴포넌트가 날린 throw를 감지하여 각기 다른 부모에게 책임을 위임합니다.
throw Promise발생 시 (로딩 중): 조금 이따가 해결될 일이면 가장 가까운Suspense가 캐치하여fallback을 렌더링.throw Error발생 시 (데이터 요청 실패): 데이터 통신에 완전히 실패했다면 Suspense는 이 에러를 처리할 능력이 없습니다. 때문에 이 에러는 계속해서 위로 전파되며, 결국 이를 처리할 수 있는ErrorBoundary가 나타나 캐치하여 에러 UI를 렌더링합니다.
즉, Suspense는 오직 기다림을 처리하는 데 특화되어 있을 뿐, 실패(Rejected)를 처리하는 기능은 없습니다.
따라서 비동기 요청의 3가지 상태(대기, 성공, 실패) 중 완벽한 생명주기를 선언적으로 다루기 위해서는 실패를 전담하는 방패인 ErrorBoundary가 선택이 아닌 필수로 함께해야 하는 것입니다.
결국 데이터가 아직 없으면 에러를 던지듯 Promise를 던져버린다라는 React 팀의 발상의 전환이, 비동기 통신을 마치 동기적인 코드처럼 위에서 아래로 짜게 만들어준 Suspense의 핵심적인 원리입니다.
Suspense Boundary 설정의 어려움
React Suspense가 편한 기능이라는 점, 그리고 비동기 흐름을 선언적으로 감싸면서 로딩 UI를 부모에게 자연스럽게 위임한다는 것은 분명 장점이 됩니다.
하지만 컴포넌트들을 하나둘씩 감싸다 보면 가장 먼저 부딪히는 문제가 있습니다. 바로 Suspense 경계를 대체 어디까지, 어떻게 잡을 것인가?에 대한 고민입니다.
현실적인 한계점과 우려들
1. 로딩 흐름이 암시적으로 감춰진다는 점
데이터를 가져오는 컴포넌트가 여러 개일 때, Suspense를 최상단에 하나만 쓴다면 어떻게 될까요?
물론 코드는 깔끔해집니다. 하지만 로딩과 에러 흐름이 컴포넌트 내부에서 명시적으로 드러나지 않게 되면서 디버깅이 어려워집니다. 어떤 비동기 요청이 Suspense를 트리거시킨 거지?, 에러 바운더리는 이 컴포넌트들의 에러를 전부 커버하고 있는 건가? 같은 의문들이 파악되지 않는다는 점입니다
2. 미리 보여줄 수 있는 것 까지 지연시켜버리는 현상
경계를 크게 묶었을 때의 또 다른 문제입니다. A 데이터와 B 데이터를 비동기로 받아올 때, A 데이터는 일찍 통신이 성공해서 충분히 화면에 뿌려줄 수 있음에도 아직 끝나지 않은 B 데이터 때문에 전체 화면이 멈춰 선 채로 거대한 로딩 스피너를 유지하게 됩니다.
이걸 해결하고자 각 컴포넌트별로 Suspense Boundary를 잘게, 그리고 세밀하게 나누다 보면 그 '설계' 자체가 엄청난 자원 낭비가 됩니다.
그럼에도 불구하고: 오직 성공에만 집중하기
그렇다면 우리는 이 설계 비용을 치르고서 굳이 Suspense를 써야 할 이유가 있을까요?
이 고민에 대한 해답으로, 2021년 토스 슬래시(SLASH '21) 컨퍼런스에서 박서진 님께서 발표하셨던 내용을 빌려 이야기를 마무리하고 싶습니다.
Suspense를 단순히 loading 화면을 우아하게 그려주는 도구라고만 생각하면 이 개념을 절반만 사용하고 있는 것과 다름없습니다. Suspense와 ErrorBoundary 안쪽에서 동작하는 비동기 컴포넌트에게는 단 하나만 집중하면 됩니다. 바로 나는 무조건 이 데이터 호출이 성공했을 때의 로직에만 집중하겠다는 확신입니다.
만약 Suspense 없이 일반적인 컴포넌트에서 비동기 데이터를 다루면, 데이터는 언제나 성공(data)일 수도, 아닐 수도(undefined나 null) 있는 불안정한 상태를 가집니다. 그래서 사용하는 곳곳마다 데이터를 쓸 때 타입 단언이나 옵셔널 체이닝(?.)을 붙여 주어야만 에러를 없앨 수 있었습니다.
하지만 Suspense 안으로 진입했다는 것은 이미 데이터가 존재한다(data !== undefined)는 것을 보증받은 셈입니다.
개발자는 데이터가 없을지도 모른다는 의심이나 실패했을 때의 분기 처리를 신경쓰지 않고, 비즈니스 로직에 맞춰 화면을 그려내기만 하면 됩니다.
마치며
처음 Suspense를 사용했을 때는 신기했지만 뭐든지 여러 번 쓰고나면 항상 내부 원리가 궁금해져서 포스트를 써보게 되었습니다.
Suspense의 원리를 찾아보다 설계 원칙이나 목표하는 방향이 자연스럽게 녹아있다는 것을 알고나서는 내부를 파헤치는 과정이 재밌게 다가왔습니다. 그리고 생각보다 원리가 간단?한 경우도 있지만 막상 떠올려보면 쉽지 않은 경우가 많았는데 만든 사람들이 정말 대단하다고 느껴졌습니다.
실제로 Suspense를 한 페이지 내에서 보여줄 때 경계를 나누기 애매해서 여러 기술 블로그들도 찾아봤었는데 아직도 기준을 잡는게 어려운 것 같습니다..
앞으로 비동기 처리 잘 하려고 노력해야겠습니다.
참고 자료
토스ㅣSLASH 21 - 프론트엔드 웹 서비스에서 우아하게 비동기 처리하기